Last time we focused on the first two parts of the pipeline. The pipeline was a key component in having productive research. If you’re unfamiliar with any of these phenomena, please pause here and read the first part.
Last but not least, The computational resource - the heart of the pipeline. If you’ve have opened these articles for free beer, it’s the time my friend. You will soon find out how to train several versions of your model on Tesla P100 GPUs at the same time!
Essential Part 3: Computational Resources
First, we need to define the “stage” concept mentioned in the previous post. Each stage is a single self-contained Jupyter notebook, which contains the instructions to download its input data, perform its desired task, and save its output on the cloud.
Therefore we could upload the notebook to whatever computing platform we want. Or even stop the executing and resume the training somewhere else.
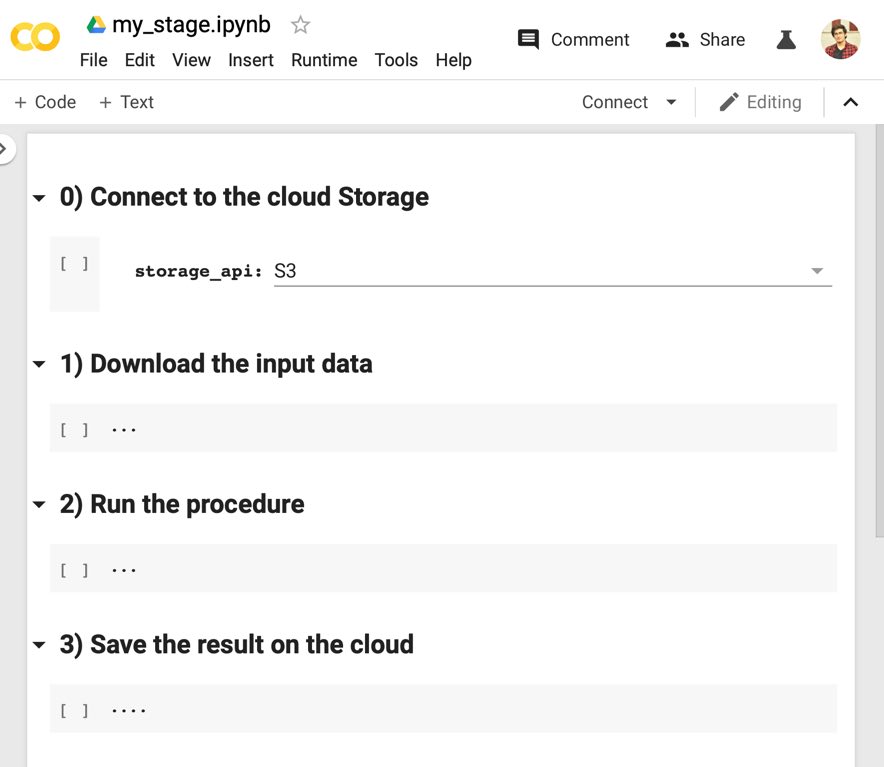 Figure 1 - An example of Jupyter notebook which implements the stage concept.
There are two primary platforms which offer free GPU & CPU computational resources: Google Colab and Kaggle Kernels. Although they are both products from Google, Both of them have their own weaknesses and strengths. I will review them in terms of hardware specs, ease of use, and their integration with our pipeline.
Hardware Specs:
CPU-only VMs
| Parameter | Google Colab | Kaggle Kernel |
|---|---|---|
| CPU Model Name | Intel(R) Xeon(R) | Intel(R) Xeon(R) |
| CPU Freq. | 2.30GHz | 2.30GHz |
| No. CPU Cores | 2 | 4 |
| CPU Family | Haswell | Haswell |
| Available RAM | 12GB (upgradable to 26.75GB) | 16GB |
| Disk Space | 25GB | 5GB |
The 25GB version of the Colab is not available by default. But if you consume all of your available RAM, it will suggest you to upgrade to a VM with more RAM. I’m sure you can come up with a script to fill up the RAM artificially.
As you can see, each of them can be a better option for specific circumstances. If your task is more memory consuming, then Google Colab is the right choice for you. In other hands, Kaggle Kernel is more suitable if you have a parallelizable script.
GPU VMs
| Parameter | Google Colab | Kaggle Kernel |
|---|---|---|
| GPU | Nvidia K80 / T4 | Nvidia P100 |
| GPU Memory | 12GB / 16GB | 16GB |
| GPU Memory Clock | 0.82GHz / 1.59GHz | 1.32GHz |
| Performance | 4.1 TFLOPS / 8.1 TFLOPS | 9.3 TFLOPS |
| Support Mixed Precision | No / Yes | No |
| GPU Release Year | 2014 / 2018 | 2016 |
| No. CPU Cores | 2 | 2 |
| Available RAM | 12GB (upgradable to 26.75GB) | 12GB |
| Disk Space | 358GB | 5GB |
Google Colab is offering two different GPU Models since 2019: K80 and T4. However, you can not select which of them you want due to the availability issues. Apparently, each user has a limited quota for T4 GPUs. This means having nice GPUs in Google Colab is not always guaranteed.
As it’s shown in the table, Kaggle Kernels’ GPUs are generally better. But the T4 on Google Colab is a newer chip, and consequently, it does support mixed-precision computations. It other words, we can enjoy a speed-up from float-16 training. To further compare their performance, we present the training time needed for the same task, model, and hyperparamters but on the different GPUs:
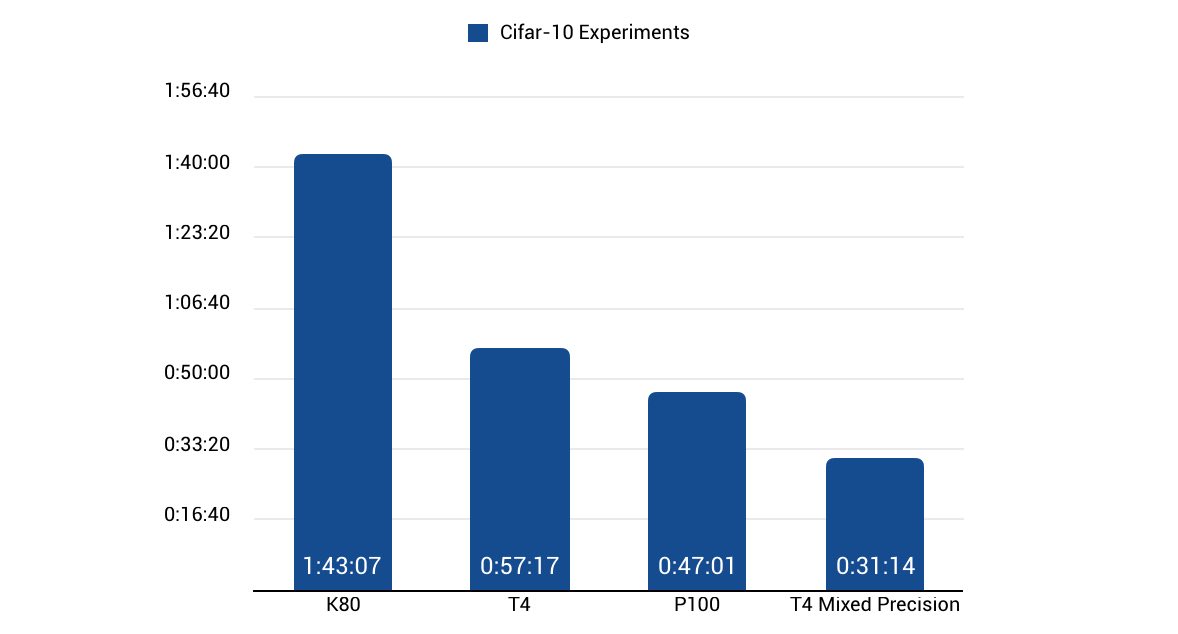 Figure 2 - Training time on different GPUs. We directly represent numbers from here
Another point to mention is that this result does not hold up very well in the case of RNNs. Because they are not naturally parallelizable materials. This property makes it hard for them to benefit from the extra Teraflops available in fancier GPUs. Indeed, the bottleneck of RNN’s performance is the GPU’s memory speed. In this regard, Google Colab’s GPUs with a higher memory clock could potentially deliver better performance.
Ease of use
Both Kaggle and Colab supports Jupyter notebooks (in their own unique flavors), Google goes even further and saves the notebooks on Google Drive. Hence you could work on your model collaboratively. Colab provides more joyful user experience (for most of the parts) due to its file browser and code editor. Surprisingly, you migth find Kaggle more responsive to scroll.
Despite the UI parts, there is one more important aspect to mention. If you don’t pay enough attention to this part, you’ll probably get frustrated with the experiments.
Although both Colab and Kaggle offer free GPUs, the execution time is quite limited. For example, Colab will remove your entire VM 12 hours after it was created, no matter how much of your training is remained.
Moreover, if you close the Tab, or lose your internet connection for more than 90 minutes, it also removes your VM. Then re-running your experiment is unavoidable.
| Parameter | Google Colab | Kaggle Kernel |
|---|---|---|
| Max execution time | 12 hours | 9 hours |
| Max idle time | 90 min | 60 min |
So how can I train my model for more than 9 hours? Luckily, we have thought of that. We connect our VM to the Cloud storage at its startup. Therefore you can save the model’s checkpoint periodically on the cloud. So even if you got kicked out after 9 hours of training, you could restart the session and resume your training right where it had left.
But there is another issue which we can do nothing about it - The idle time. You have to keep the Tab open and your internet to be connected during the whole time. I know it might sound insane, but come on! Look on the bright side. You can use powerful GPUs for free!
The last point I want to mention is the service registration, particularly the Kaggle’s website. To connect your VM to the internet, it does need you to verify your phone number. The sad part is that they don’t support Iranian phone numbers anymore. So depending on where you live, you may have to look for a valid phone number. If you couldn’t find anything, drop me a line at my email address. Nonetheless, Colab gets a +1 in this section due to hassle-free registration.
Best practices
I mostly use the Kaggle for training and Colab for the processing and visualization since the powerful GPUs are not always available at Google Colab. Furthermore, Colab has something called Forms, which really helps creating clean notebooks.
Do not use neither Colab nor Kaggle for your developments. First, auto-complete and all other coding assistants are at their minimum level on the Jupyter notebook environment. Secondly, you have to update all previous notebooks in the case that you’ve found a bug in your code.
Move your development to a feature-rich IDE and use a private repository on Github (or Gitlab) to host your code. Then you can simply download your code on the notebook using the git clone command.
Additionally, you can have another private repository to keep your utility tools (Connecting to the cloud storage and etc.). In such a way, you can update the utility parts without having to change all your notebooks.
Bonus Point
To store, sort, and compare the evaluation results, you can use all kinds of methods. However, there is a possibility that it might get lost or you can easily get confused by lots and lots of numbers from various experiments. I suggest you use the MongoDB cloud. It provides a free, reliable, and fast (enough) cloud database. You can store the results on the cloud and then use them later either by your custom script or MongoDB Compass App.

Summary
In this series of posts, I have illustrated my workflow for Deep Learning research. It is neither a perfect method nor the only way to be productive. But it really helped me speed up my experiments in the lack of adequate computational resources. If I didn’t create this pipeline, I would be probably in the lab’s queue to run my initial tests.
I understand creating such a pipeline could take your precious time even up to a month. But trust me! You will not regret it.
A big shout out to Google for providing such priceless platforms. I couldn’t make it here without them. Please keep up the good work ❤️.
I hope you’ve found these articles useful, please let me know if you didn’t fully comprehend any part. If you have any suggestions, I’d be glad to hear them out.